
Early December Ice Storm on Burdoin
December 6, 2014

I can’t believe a month has gone by since my last post!

Where has time gone?

Where is my Rocking Chair – will sitting in one make time slow down?

I need more time. More time to just breathe.

Life has been crazy busy and today I am forced into having that extra time to breathe.

And to catch up.

Because for the first time EVER I had to cancel my appearance at an art show.

Even if I COULD carry my heavy boxes of glass across the ice to my car…
 …there’s no way my car will go UP my driveway.

If you were planning to shop for holiday gifts from me you can still see my work online.

You can click here for my Zibbet shop…..
…or you can click here for my Artfire shop.

If you want to see my work in person, go to Columbia Arts in Hood River…

…or Artisans Designs and Gallery in White Salmon.

Hood River Jewelers has a nice selection of my bowls….

J D Smith Jewelers in The Dalles has a selection of my jewelry….

…and don’t forget the Hood River Holiday Pop Up Gift Store at Gallery 301 in Hood River!

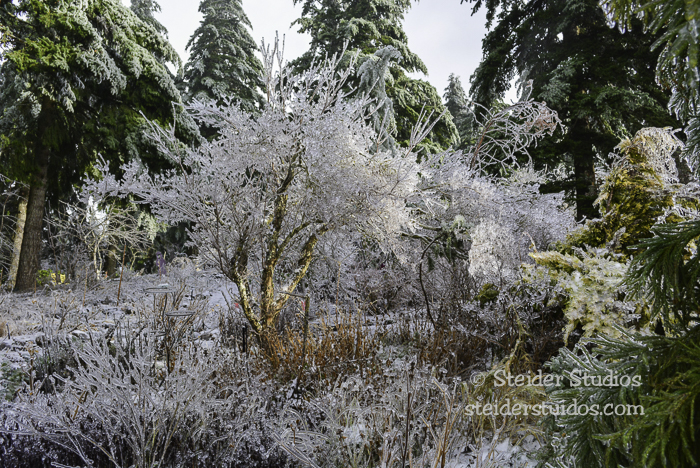
Back at ‘The Ranch”, there is half to one inch of ice covering everything.

That includes my car, trash barrel, mailbox, garden and driveway.

This morning I took my camera out to capture some of it.

In a way it was pretty … and I AM catching up … and even breathing today!


My bird sculptures are pretty in ice (made by Sherm Rouse).

At least I’ll be toasty ‘weather’ I get out or not! Hope you enjoy our winter wonderland and don’t get ‘stuck’ anywhere.
Special Gift for a Special Dad
June 16, 2013

Happy Father’s Day Weekend to all the men making a positive difference in the life of a child! I’ve been working on a bird bath that was commissioned as a gift for a special Dad this week. Below are my process photos:

Powdered glass is sifted in a pattern on top of a sheet glass substrate, then lines are drawn through the powder. Disc is fired in a glass kiln for about 16 hours.

Second layer of glass powder is added to client’s bird bath, mimicking the first layer, but overlapping colors will be richer. Lines are drawn alternating with the under-layer design. Additional red accent dots are added to balance how bright the central red ring turned out. Firing schedule includes a slow ramp up, long bubble squeeze and careful annealing.

Out of the kiln, a bit of cold-working (grinding the edge to eliminate any rough spots and to form a perfect circle) then it will be almost ready to shape into a bird bath form.

I auditioned it in my sunlit garden to make sure the iridescent sparkle in the glass showed through these colors. Next I add some lines of gold duplicating those drawn through the powder, then it’s ready for it’s final firing.

To shape the disc into a functional bird bath, I ramp the heat up slowly overnight so I can watch it and control the process the following morning at my leisure. Center of glass slowly ‘drops’ or sags through the open center of a ceramic ring. At 1200º it took about 35 minutes – may have taken less time if I weren’t introducing cool air every 3 minutes as I peeked to watch progress.
When I like the shape, I quickly ramp down to the anneal segment, then wait until the glass is at room temperature before removing it from my kiln. A potter friend made this ceramic ring for me in a larger size than commercially available.
Next up some pendant lighting and a cool outdoor fence/gate project!!
If you like this post, sign up to receive an email for future posts so you don’t miss anything. It’s easy, just click the box at the top right of this page that says ‘Sign me up!’ and type in your email. It’s right under the yellow close-up photo of my work.
Friday February First
February 1, 2013

Happy Friday! Happy February! Tonight is my opening for The Blues at Columbia Arts in Hood River. 30 artists have submitted wonderful work and I know I’ll see some of you there! Columbia Arts hosts fabulous winter parties for their openings this time of year.
One week from today the Yard, Garden & Patio Show opens! I’ll be in booth 659 near the display gardens. Stop by, say hello and tell me you follow my blog.

This morning I’ll be pulling new wall pocket vases out of my kilns. I have lots of new glass for your home and garden PLUS….
 I’ll have new note cards made from my photographs AND some canvas wraps and metal prints that are absolutely stunning! I am loving my new photographic efforts and results.
Get $2.00 off admission with this coupon: YGP 2013 admission coupon

Next on my calendar is a mini-solo show at ‘The Nook’ at Columbia Arts. It will open March 1st, in addition to work I’m submitting for the ‘Gorge Artists Open Studios Preview’ at Columbia Art Gallery with 29 other artists.

This just in, my jewelry is included in an article, ‘Top Jewelry Trends’ in Glossi Magazine!
April will be a killer month with an event each weekend, beginning with the Glass Craft & Bead Expo in Las Vegas – although my classes are not filling this year, so I may not get to go. My open studio sale is the second weekend, followed by ‘Artists of the Gorge’, a weekend art show at Columbia Gorge Hotel in Hood River! The last weekend in April is the largest show of my year, ‘Glass Gallery’ in Portland at the Convention Center. The Gathering of the Guilds is the largest event of its kind on the West Coast and is always a must see. If at all possible, plan to spend a couple of days perusing all the fabulous art at this show. There is so much to see, so many artists and media that you’ll want to take home one of everything!
Introducing Buggettes in a Rainbow of Color
February 5, 2012

|
Introducing my new ‘Buggettes’, just in time for the Yard, Garden & Patio Show at the Oregon Convention Center. I’ll be in booth #1481 near the Hardy Plant Society. I have about two weeks left before the show opens on February 17th and always seem to come up with fun new ideas at the last minute!
|

I always start with a sketch. In this case a very simple sketch. Next I make a pattern or template, cut out some glass & stack it up to see if it fits together.

I like to make prototypes in different colors to see where my idea might go. If you noticed my sketch says ‘Blue Bug’, because that was my original idea – Blue Bugs to go with my Ladybugs. But who wants to stick to just one color?!!

I loved the prototypes, so started pulling out my stash of pattern bars, pot melt chips, twists, cane, frit balls and everything else close at hand for wing designs.

You already know how much I love color. I had to make at least two (in case I want to keep one) of every color I have in each color family. The green group above is ready for the kiln.
 This group of blue, lavender and plum buggettes, fresh from the kiln is ready to sign, price and pack. The coiled copper antenna is designed to wrap around a small tree or shrub branch so they hang in your garden and mine.

I’ll have them available for $20 along with my standard glass ladybugs…

…and glass garden fairies. I love these girls! Not only do they provide whimsical color when my flowers fade, but they are full of personality. They might have glow in the dark glass embedded in their wings and they’re all fully finished, front and back. I offer these at $75…I know a bit expensive, but very time consuming to make. Cost includes hair styling, make up and wardrobe!

|
Today I’ll start replenishing my Beautiful Butterflies. You saw how I make these in my November ’09 post, ‘Butterflies are Free‘. Beautifully detailed and textured, you’ll find these in my booth for $30.
|

I’ll have recycled glass and art glass wall pockets starting at $12…


You know my booth will be filled to the brim with colorful glass, all garden related! My booth is near the Hardy Plant Society, #1481, be sure to let me know you read my blog!

Oh, and I have discount admission coupons for you! Click the link below & print.
The Yard, Garden & Patio Show at the Oregon Convention Center on MLK Blvd, February 17 – 19 (don’t forget I’m in booth #1481).
See you there!!
If you like this post, sign up to receive an email for future posts so you don’t miss anything. It’s easy, just click the box at the top right of this page that says ‘Sign me up!’ and type in your email. It’s right under the yellow close-up photo of my work.
Working With Wall Pockets…
June 1, 2011

I’ve spent the last few days of May uploading items into my Zibbet shop. Mostly wall-pocket vases, but also a couple garden fairies and earrings. I haven’t put a dent in the amount of work I have here that needs to be photographed and written about, then loaded into my shop. I plan to use my non-garden-worthy days this summer to accomplish that task.

Most of the end of May was spent putting my cabin back together after back to back studio sale weekends….well, almost. There’s much still to do, but I’ve got the major tasks accomplished. We can toss the dog toys again, so it’s back to normal living. And I can get back to work! I have a couple interesting orders waiting on my workbench. And I need to make more bracelets!

This last week I’ve been talking with a couple of studios about teaching. Confirmed is Palmer Alaska at the beginning of August. Yes, it’s true, I’ll be teaching for Half Moon Creek again. How I love that studio/gallery and the ladies who own it. Let me count the ways by sharing (again) my class from last summer in this post. (Just in case you missed it the first time).
I love Alaska and can’t wait to go back! I’ll be teaching Powderology again plus my ‘Build a Better Pocket’ class. I think the classes will fill fast, so if you’re interested in joining me in Alaska (and I do hope you are), better contact Half Moon Creek soon! I promise you’ll have a spectacular time!

Welcome to Palmer Alaska
June 25th will be the one year anniversary since I launched Steider Studios Glass Medium™. I plan to have a follow up blog post showcasing how you are using it. I have a few photos that some of you sent me, and will be posting them unless I hear otherwise. If you’re using my medium, I want you to send me a photo or two for sharing – with links to your sites. Yes all your sites, I’ll promote you with wild abandon!
![]() Whether you call it ‘glass clay’ or ‘glass paste’, I’ve seen some amazing work that’s being done with it & can’t wait to share it with you. Send your photo(s) to me at: Linda at SteiderStudios dot com. Thank you!!
Whether you call it ‘glass clay’ or ‘glass paste’, I’ve seen some amazing work that’s being done with it & can’t wait to share it with you. Send your photo(s) to me at: Linda at SteiderStudios dot com. Thank you!!

Most of you know that BECon is happening mid June and I’d been on the fence over whether to go or not. I was looking forward to getting together with friends coming in from all over the world while they were here in Portland, only an hour and a half from where I live. Alas, Granny decided for me that I definitely wont’ be there. She wanted to rest eternally next to Grandpa in Rose Hills and as it happens Rose Hills was booked until mid June.
 Lastly, I’d like to invite you to a gallery show I’m participating in, ‘Get Centered‘ at Columbia Arts in Hood River. The reception is this First Friday, June 3rd from 6 to 8pm and runs through the 26th. It’s a celebration of Columbia Arts’ first five years in the current space. Some fascinating work was delivered today, don’t miss it!
If you like this post, sign up to receive an email for future posts so you don’t miss anything. It’s easy, just click the box at the top right of this page that says ‘Sign me up!’ and type in your email. It’s right under the yellow close-up photo of my work.

Mother’s Day weekend was rainy, yet full of promise for the annual Plant Sale at the OSU Extension Office Learning Garden in Hood River. Master Gardeners hurried through their tasks setting up the sale as I set up my table full of garden art. You know I’m an avid gardener. I was in the Master Gardener program for a number of years but alas, ran out of time to volunteer.

They kindly invite me back each year to participate in this special sale, as a provider of colorful glass garden art. Who doesn’t need a ladybug or two in their garden?
 Of course, they know I’ll be an excellent customer while there! This year my favorite purchase was Red Wiggler worms! I was so excited to set them free into a warm area of my garden. I feed them daily to make sure they don’t wander off, but stay and work my soil.
 This trio of sweets had a table of treats to keep our energy levels soaring.
 All in all, most people that came through were buying plants of course, not art. The worms, treats and my garden art were picked up here and there, but most visitors to the Learning Garden had their heads down reading plant descriptions and checking out the best plants to buy.

As Promised….
May 27, 2010

…from my September ’09 “Progression-of-a-project” post, here is the finished project, finally installed this month in the Japanese Garden, located at the OSU Extension office in Hood River. It’s a small portion of the Master Gardener’s Learning Garden which sits above the Experiment Station orchard. My glass insert plays a supporting role in Tom Herrera’s sculpture and I’m honored to have it there. A lovely setting, wouldn’t you say?
Glass Inserts for a Fence at Maryhill Museum
March 6, 2010
It’s been a whirlwind romance for this project, with a very short timeframe. Tom Herrera is transforming a fence retrieved from Sam Hill‘s Seattle estate and installing it at Maryhill Museum’s new Windy Flats Walkway and Viewpoint. He’s asked me to produce 4 glass inserts, for the ends and center of the fence. So, with no time for research, I pulled earlier visits to Maryhill from my memory banks. I always loved the Loie Fuller exhibits and made a quilt honoring her back in my fiber arts days. I have also photographed and rendered the peacock population in pastels many times, trying to capture the lovely iridescence. Tom’s only prerequisites….colorful and 1/2″ thick!

With those thoughts in my mind, I played with fine frit and powdered glass on sheet substrate to see which would yield a better result. Above photo on the left is the powder test already fired and on the right is the frit test ready for its first firing.

The frit wasn’t as crisp as the powder, when stacked and fused into four layers, so I chose powder, the finished sample pictured above.

Above are the 20″ panels and below are the 12″ panels, stacked and almost ready to load into the kiln for the final firing.

I was so involved with the process that I didn’t remember to photograph all the steps along the way. Cutting the glass, sifting the powder, then drawing lines through.

Two views of the 20″ panels, cleaned after the first firing and ready to stack & fuse together.

Below are the 12″ panels, after the first firing.

Side view of 20″ panels, topped with clear iridescent glass for a sparkly effect.

Loaded into the kiln, held in place with kiln furniture to prevent the glass from flowing when heated to process temperature. That’s where the project is now. And will be for another day. Waiting with crossed fingers and toes hoping it comes out as planned, that nothing goes wrong in the kiln. The project is due out of the kiln on delivery day, so there’s no time for error. Which is why I chose an excruciatingly long firing cycle, ramping up at 100 degrees per hour.

I’ll post the final outcome with sun glowing through the panels which is how you’ll see it at Maryhill. Better yet, join us Saturday, March 20th for Maryhill Museum’s opening event. The dedication of the new Windy Flats Walkway and Viewpoint will be at 4 p.m.
If you like this post, sign up to receive an email for future posts so you don’t miss anything. It’s easy, just click the box at the top right of this page that says ‘Sign me up!” and type in your email. It’s right under the yellow close-up photo of my work.
Butterflies are Free…
November 4, 2009
…If your name is Diana and you’re my sister’s Best Friend!

Diana has been patiently waiting for her butterfly since August. She happens to be my sister’s best friend and asked me casually while I was visiting my sister if I’d make her a butterfly. Not one to turn down any opportunity to add original art glass to someone’s home, of course I said yes, knowing full well that I had a hectic schedule awaiting my return home. Butterflies are small and I knew I could easily fit them into my work schedule. Couldn’t I? I love these colorful butterflies and my stock of them was almost extinct, so it was time to make some new ones anyway.

Notice how I say them and these, not it? If you’ve followed my blog, you know that I can’t just make ‘one’ of anything, so finding a day to make up a kiln load of butterfly bodies, just couldn’t be done! I wanted Di to have a good selection to choose from so I needed to make not just one, but a kiln-load of butterflies. Diana saw three prototypes from which to choose the style and color she wanted; then waited again until I could finally find a day to get the bodies made.

Fitting them in between projects became problematic because they require a different firing schedule than the rest of the work that generally ships out of my studio. Oh, I got their little bodies made up & fired; it was the final firing with the color and wing patterns that took some time to work into my schedule. Here they are after the first firing joining the wings to their bodies. My canvas ready to ‘paint with glass powders’.

Working with glass powder is a fragile way of working with glass. The slightest puff of wind or bump in the studio can ruin your design, so I had to fit them into a day where nothing else was happening and I had an available kiln ready to accept them immediately after building each one. I didn’t want them lying around my studio waiting for disaster to happen. When working with powders I like to have a color reference and all my tools within reach.

The glass powder is sifted on. Lines are drawn in. Diana wanted yellow, orange and lime green. I used Bullseye glass 1120, translucent Canary yellow as my base color with 0025 Tangerine and 0126 Spring Green opal (not translucent) accents.
 I also wanted to duplicate the model in my Butterfly Encyclopedia, so used translucent 1122 Red with Tangerine opal. Then I began wondering how it would look with 0334 Gold Purple and 0147 Cobalt Blue opal accents.
 Not to mention how would it look as a pink using 1332 Fuchsia with 0334 Gold Purple accents; or a blue using 1464 True Blue with Spring Green accents; and 1442 Neo Lavender with Gold Purple accents! Alas, after that I was out of bodies again since I’d only made nine blanks, so my explorations had to end. For now anyway.
 And here’s how they look after firing. All they need now is a signature and they’re out the door. My original versions pretty much stuck to depictions straight out of the encyclopedia, mimicking true-to-life butterflies. My approach this time exploring color and line was less tedious and much more fun!!!

Diana plans to hang hers in the dining room for wall decor. I like to place my butterflies in my garden strategically where I need spots of color, wrapping the copper spirals around small branches of trees and shrubs. I also keep one in my ‘Pretty Powder Room’. Other glass butterfly owners have hung them in windows, set them in planters, and rested them on counters. Where would you keep yours?
Progression of a Project:
September 21, 2009

Insert for Japanese garden sculpture. Project for Tom Hererra.
Fellow artist and sculptor Tom Herrera had me make some glass inserts for his metal work recently. I’ve made dragonfly wings, a couple sea turtles, a deco style guitar replica, and the latest was an insert for a sculpture he’s making for the Master Gardeners’ new Japanese Garden.
He brought me a drawing of his sculpture and we discussed his vision which included the use of triangles and warm rich color. He wanted a half inch thick 7″ square that would be finished with a half inch metal frame. Translucency was of utmost importance.
After researching Japanese Garden Design, I chose to concentrate on water and stone as my elements and sketched out a few possibilities. My color choices representing stone are in keeping with Tom’s vision.

Building the layers
In the photo above, I’m building the layers of ‘water’ using Bullseye’s 1116 Turquoise on top of clear irid with the irid up so it will sparkle without the glare of the coating being so obvious. I use this approach often as I love the sparkle of irid but it’s a more subtle effect.

Capping the triangles with more irid.
Next I clear capped with more iridescent clear glass, but this time the irid is facing down. Again, this is for subtlety and so the face of the project matches the back. I frequently check my notes and sketches making sure the design in my head translated to paper is corresponding with the glass (turning out the way I want it to).

Filling in the stone path.
Now ready to fill in the ‘path’, I’ve mixed 3 to 5 colors each of gray & brown -02 frit (medium) in translucent and opaque; purple and pink -02 frit in translucent and opaque; and a couple off white opaques. I mix them ahead of time for a more even application of color, alternating between the mixes as I fill the path.

Ready to fire.
The final step is topping the path off with clear frit (I used -03, course) so it matches the front and back with a layer of clear glass to look through before the eye sees color. You can see the set up inside my kiln, just prior to firing, surrounded with fiber paper and held in place with cut up kiln shelf.

Finished.
Forgive the quality of the final image, I was at the end of my deadline so this was taken atop a neutral canvas bag as I delivered it to Tom at Starbucks where we meet for deliveries. The top image shows how the piece glows in the sunlight which is how it will be viewed. In this photo I wanted to capture the iridescence. Tom promises to get a photo to me when it’s installed and I’ll post it here. When Tom gets his blog going, I promise to link to it so you can see his work!


